Category: Paintings

Colourful feathers!

No Comments

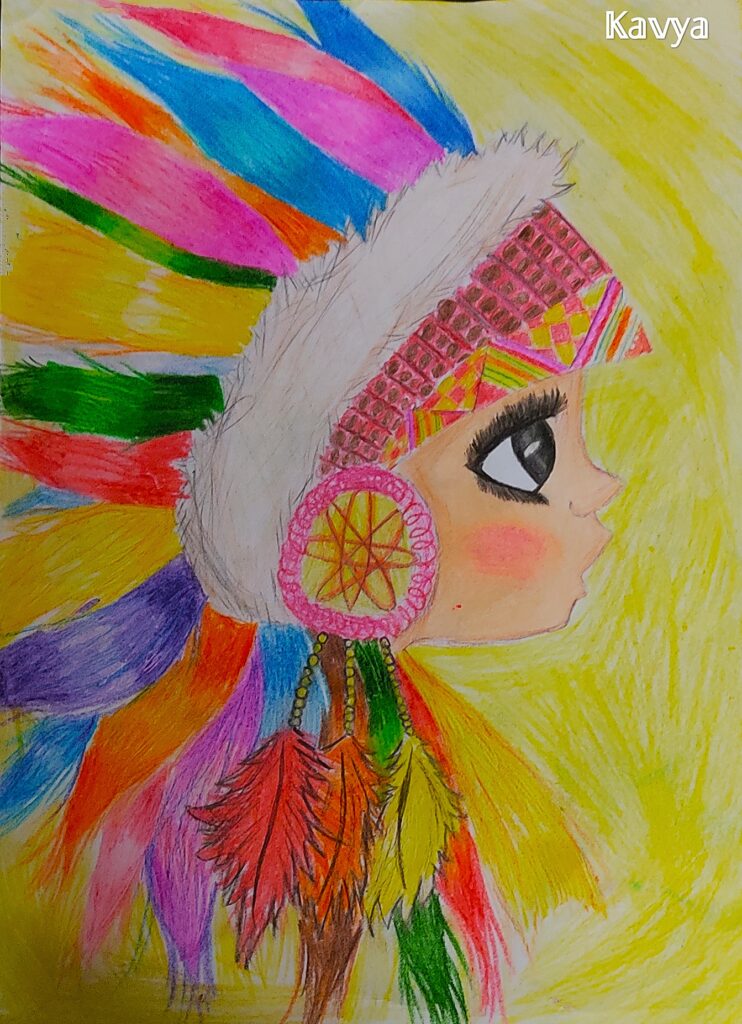
This is my first colour pencil drawings. This is a Native American girl. I chose this because I could practice on how to do feathers in colour pencils. First I drew the picture. Then I did the skin.. the skin is just the colour peach and for the shading I used brown.. for the blush I did it with the colour magenta a.k.a dark pink. Now for her beautiful suprised eyes, they just black and with a hint of grey.. Now for the most attractive part! I love how the colours vary from red to brown to blue ect. I first start with the lighter colour and give a solid, opaque shading. And then with the darker colour just add thin strokes to make it look more realistic.. Repeat the same with every feather. And make sure each one is a different colour. And that’s all! Your drawing is done!!!! Looks lovely๐Ÿ˜Š

The magic of glass paints!

No Comments

This is one of my favourite glass paintings. Not just because of the colour but also because I love floral paintings. For this you need a plain glass, glass paints and a glass out liner. So first I draw the picture on a plain sheet of paper. And then, as the glass is transparent you can see through your drawing. So trace your drawing onto the glass with the black glass out liner. Now this part takes a lot of time, you have to patiently without any bump in the lines squeeze it. After the out liner is dried, time for the fun part! Take you glass paints and squeeze those magical colours onto the respected areas.. As the out liner is thick, it acts like a wall between the colours and prevents it from bleeding through. And don’t forget to pop any bubbles that come when you squeeze you glass paints immediately. And that’s it done! Now you can hang you masterpiece on your wall for a pop of colour๐Ÿ˜

Majestic White Tiger

15 Comments

This is one of my favorites. I did this in poster colors. For this painting, you’ll need only four colors that are: White, Black, blue and Prussian blue (dark blue). So for drawing the picture, you first start with the eye. You place the eye a little bit above the middle line if it is A3 size paper or canvas. If it is a square paper or canvas you place the eye at the middle of the page. Then after drawing the eye, start with the stripes. Make sure the stripes near the face are connected to each other. The other stripes can be parallel to each other. [For more information see there picture that I have painted ๐Ÿ‘†] After finishing the drawing, you have to start painting the lightest color of the painting which is white. Then you have completed the picture already by finishing the drawing and the white part. Now it is time to do the second part which are the black parts. Paint the other stripes in black. After that you have to take a very thin brush and do very small hair or fur at the sides of all the stripes. This takes a long time but it was all worth it at the end. I felt very proud seeing the final picture. And I felt very happy that my friends and family appreciated my painting a lot. ๐Ÿ˜๐Ÿ˜

The Rainbow Butterfly

No Comments

This is a very colorful painting and is one of my favorites. I did this in poster colors. This is a very simple painting. After drawing the picture, I start with the background. I used a very light green for this. You can also use other light colors like Baby blue, baby pink etc. After painting the background. I started the colors inside the wings which is the rainbow colors. After finishing those colors. Take a darker shade of those colors that are;

For :-

Red: Red + Black = Maroon

Orange: Orange + Red = Saffron

Yellow: Yellow + Orange = Dark yellow

Green: Green + Dark green = Leaf green

Blue: Use dark blue or Prussian blue

Purple: Purple + Black = Dark Violet

With those colors, outline their respective base color. Ex. For Red you have to outline with Maroon. Do the same with other colors too. Then I did the body of the butterfly in gray color. Finally, I did the black part. And thats it! I like this painting because it is simple, beautiful and colorful and the rainbow colors go very well with the black.

Ganesha: A melange

No Comments

Ganesha: A melange, or Ganesha: A mixture of Colors. This is an Abstract. I did this in Poster colors. I drew the picture on a white chart paper. Then I used Multi-colors so that this Ganesha looks colorful. I used colors like Blue,Green, orange, red, white, yellow and so on. And for the background I painted brown and I took dry sponge and dipped it in Black paint and made black sponge marks. I like this painting because it is colorful, bright, and has a lot of creativity. But I still didn’t mark where the body parts of Ganesha is. So I outlined the body Parts of ganesha in black and also where he is sitting. All done! Now you can put your signature.(This step is optional ๐Ÿ˜Š)

Lost In Love

No Comments

This is a picture of Radha imagining Lord Krishna looking at her from the moon. This is a tribal art called Rajasthani Mural Art. I did this painting in Poster colors so that it is bright. I painted this in a dark blue colored chart paper, as the background is a night sky. As peach and other light colors don’t show brightly on a dark chart paper, I drew Radha on a white chart paper. I drew her as if she is leaning on an invisible railing. After many trial and errors I drew Radha correctly. After drawing everything, I started painting Radha. I used glitter pens for the jewels and the embroidery, so that it shines. Then I left the Radha aside to dry. While waiting for her to dry, I started painting the other parts. As I don’t need to do the background, I started with the curtain. I used thick Light green poster color for the curtain. Then I used dark green and water and painted on the curtain to make its frills. Then I started with the Moon and Krishna. I shaped the moon so that it looked as if Krishna is in the moon and smiling at Radha. It is a full moon day but, Krishna came and made it a Crescent moon. Then I painted the balcony railings and the clouds. Then I took Radha and cut her out. Then I took some cardboard pieces and glued it to the blue chart. The card board made Radha 3D and it was an excellent idea. And that’s it the painting is done! the result was so good to see. Everybody appreciated me.

Blossom

No Comments

This is one of my favorites. I did this in watercolors. You can Paint this on any greeting cards. This is a very easy painting for beginners in watercolors. After drawing a few flowers, their buds and some Leaves, start painting them in Bright colors like Blue, Pink, Orange(florescent) yellow, purple etc. After painting the flowers, you paint their buds in the appropriate colors, then you can start with the leaves by giving different shades of green for it. Then paint some small plants in green. And that’s it! It is so simple. I like this painting as it is very simple and is very beautiful.

Colorful Macaw

No Comments

This is one of my favorite paintings. I did this in poster colors. After sketching the drawing, I started with the upper part of the Macaw. Like that I finished the whole body with three colors Red, Blue And Yellow. But I have to show the wings of the Macaw separately. So, for the upper part which is red, I mixed red and a little bit of black that makes Maroon. Then I painted it over the red paint. I used a darker shade of Red to differentiate it from the normal poster Red. Like that I did for Yellow and Blue. For Yellow I used Light Green And for blue I used Ultramarine Blue( Dark Blue or Indigo). Then I did the background In Yellow. Then I did the beak and the branch in Grey color, in the face of the bird if you look closely you will see small stripes of Light Pink. Then at the last you put black for the eyes.

Coconut Trees at Twilight

No Comments

This a silhouette painting. I did this in water colors. For this painting you don’t need to draw anything. So I first started of with the background. I used graded wash method to do the background.

How to do graded wash?

Graded wash is a method when you take one base color and paint it at the top. Then you take some clear water and just paint horizontally from top to bottom. You are actually taking some of the paint from the top and while coming to the bottom the paint gets lighter and lighter.

After finishing the background you can do the coconut trees in black and that’s it. I like this painting because it is very simple yet beautiful.

Underwater weeds

No Comments

I did this painting in watercolors. You don’t need to draw anything for this painting, you can straight away start with the background. For the background I used Teal (bluish green). In the middle of the page I made the color lighter and around it is done with darker shade of Teal. After finishing the background I used different shades of green like; Light green, Sap green, Leaf green(Dark green+ Light Green) and dark Green. I painted tall plants as tall to that reach the top of the page in all the colors of green. After it had dried, I used saffron (to make the painting brighter) to paint the fishes. You can paint about 5-6 fishes And finally, you put a small dot for the eyes of the fishes. I like this Painting because the overlapping of the weeds look very nice.