Tag: paintings

Majestic White Tiger

15 Comments

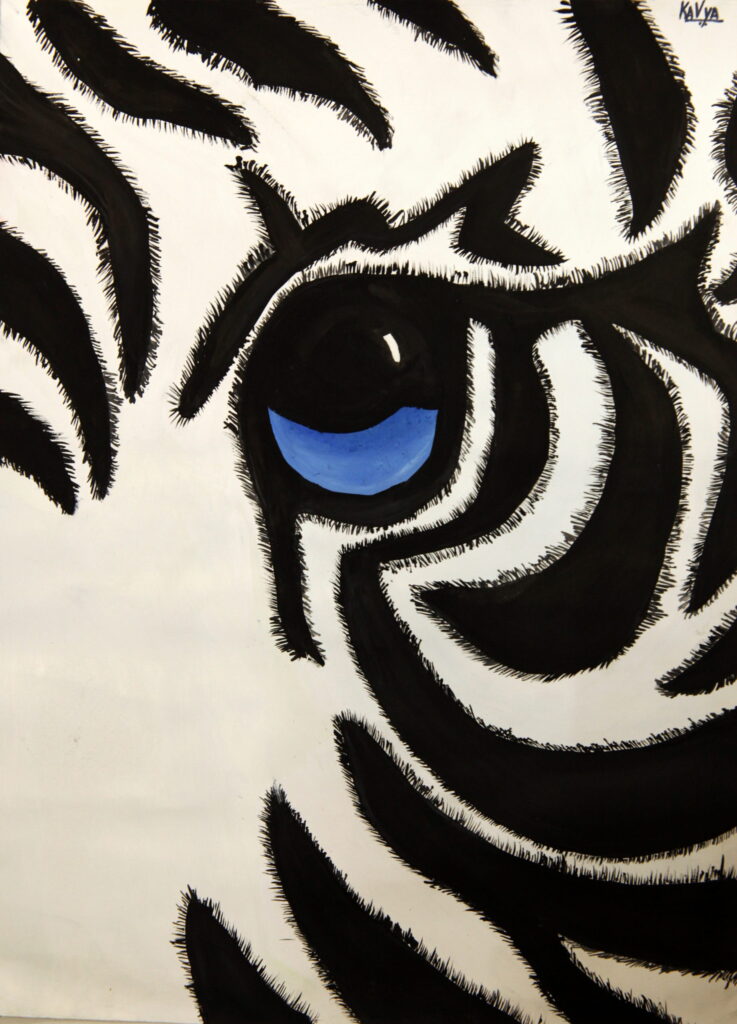
This is one of my favorites. I did this in poster colors. For this painting, you’ll need only four colors that are: White, Black, blue and Prussian blue (dark blue). So for drawing the picture, you first start with the eye. You place the eye a little bit above the middle line if it is A3 size paper or canvas. If it is a square paper or canvas you place the eye at the middle of the page. Then after drawing the eye, start with the stripes. Make sure the stripes near the face are connected to each other. The other stripes can be parallel to each other. [For more information see there picture that I have painted 👆] After finishing the drawing, you have to start painting the lightest color of the painting which is white. Then you have completed the picture already by finishing the drawing and the white part. Now it is time to do the second part which are the black parts. Paint the other stripes in black. After that you have to take a very thin brush and do very small hair or fur at the sides of all the stripes. This takes a long time but it was all worth it at the end. I felt very proud seeing the final picture. And I felt very happy that my friends and family appreciated my painting a lot. 😁😁

The Rainbow Butterfly

No Comments

This is a very colorful painting and is one of my favorites. I did this in poster colors. This is a very simple painting. After drawing the picture, I start with the background. I used a very light green for this. You can also use other light colors like Baby blue, baby pink etc. After painting the background. I started the colors inside the wings which is the rainbow colors. After finishing those colors. Take a darker shade of those colors that are;

For :-

Red: Red + Black = Maroon

Orange: Orange + Red = Saffron

Yellow: Yellow + Orange = Dark yellow

Green: Green + Dark green = Leaf green

Blue: Use dark blue or Prussian blue

Purple: Purple + Black = Dark Violet

With those colors, outline their respective base color. Ex. For Red you have to outline with Maroon. Do the same with other colors too. Then I did the body of the butterfly in gray color. Finally, I did the black part. And thats it! I like this painting because it is simple, beautiful and colorful and the rainbow colors go very well with the black.

Ganesha: A melange

No Comments

Ganesha: A melange, or Ganesha: A mixture of Colors. This is an Abstract. I did this in Poster colors. I drew the picture on a white chart paper. Then I used Multi-colors so that this Ganesha looks colorful. I used colors like Blue,Green, orange, red, white, yellow and so on. And for the background I painted brown and I took dry sponge and dipped it in Black paint and made black sponge marks. I like this painting because it is colorful, bright, and has a lot of creativity. But I still didn’t mark where the body parts of Ganesha is. So I outlined the body Parts of ganesha in black and also where he is sitting. All done! Now you can put your signature.(This step is optional 😊)

Lost In Love

No Comments

This is a picture of Radha imagining Lord Krishna looking at her from the moon. This is a tribal art called Rajasthani Mural Art. I did this painting in Poster colors so that it is bright. I painted this in a dark blue colored chart paper, as the background is a night sky. As peach and other light colors don’t show brightly on a dark chart paper, I drew Radha on a white chart paper. I drew her as if she is leaning on an invisible railing. After many trial and errors I drew Radha correctly. After drawing everything, I started painting Radha. I used glitter pens for the jewels and the embroidery, so that it shines. Then I left the Radha aside to dry. While waiting for her to dry, I started painting the other parts. As I don’t need to do the background, I started with the curtain. I used thick Light green poster color for the curtain. Then I used dark green and water and painted on the curtain to make its frills. Then I started with the Moon and Krishna. I shaped the moon so that it looked as if Krishna is in the moon and smiling at Radha. It is a full moon day but, Krishna came and made it a Crescent moon. Then I painted the balcony railings and the clouds. Then I took Radha and cut her out. Then I took some cardboard pieces and glued it to the blue chart. The card board made Radha 3D and it was an excellent idea. And that’s it the painting is done! the result was so good to see. Everybody appreciated me.

Blossom

No Comments

This is one of my favorites. I did this in watercolors. You can Paint this on any greeting cards. This is a very easy painting for beginners in watercolors. After drawing a few flowers, their buds and some Leaves, start painting them in Bright colors like Blue, Pink, Orange(florescent) yellow, purple etc. After painting the flowers, you paint their buds in the appropriate colors, then you can start with the leaves by giving different shades of green for it. Then paint some small plants in green. And that’s it! It is so simple. I like this painting as it is very simple and is very beautiful.

Colorful Macaw

No Comments

This is one of my favorite paintings. I did this in poster colors. After sketching the drawing, I started with the upper part of the Macaw. Like that I finished the whole body with three colors Red, Blue And Yellow. But I have to show the wings of the Macaw separately. So, for the upper part which is red, I mixed red and a little bit of black that makes Maroon. Then I painted it over the red paint. I used a darker shade of Red to differentiate it from the normal poster Red. Like that I did for Yellow and Blue. For Yellow I used Light Green And for blue I used Ultramarine Blue( Dark Blue or Indigo). Then I did the background In Yellow. Then I did the beak and the branch in Grey color, in the face of the bird if you look closely you will see small stripes of Light Pink. Then at the last you put black for the eyes.

Coconut Trees at Twilight

No Comments

This a silhouette painting. I did this in water colors. For this painting you don’t need to draw anything. So I first started of with the background. I used graded wash method to do the background.

How to do graded wash?

Graded wash is a method when you take one base color and paint it at the top. Then you take some clear water and just paint horizontally from top to bottom. You are actually taking some of the paint from the top and while coming to the bottom the paint gets lighter and lighter.

After finishing the background you can do the coconut trees in black and that’s it. I like this painting because it is very simple yet beautiful.

Underwater weeds

No Comments

I did this painting in watercolors. You don’t need to draw anything for this painting, you can straight away start with the background. For the background I used Teal (bluish green). In the middle of the page I made the color lighter and around it is done with darker shade of Teal. After finishing the background I used different shades of green like; Light green, Sap green, Leaf green(Dark green+ Light Green) and dark Green. I painted tall plants as tall to that reach the top of the page in all the colors of green. After it had dried, I used saffron (to make the painting brighter) to paint the fishes. You can paint about 5-6 fishes And finally, you put a small dot for the eyes of the fishes. I like this Painting because the overlapping of the weeds look very nice.

Juicy Watermelon

No Comments

This is a picture of a watermelon. I used water colors for this paining. To start with draw the water melon and the cut watermelon in the correct angle. Try to make one of the cut watermelon as someone has bit it. Then it is time to paint. Take your water colors and first finish the full watermelon by giving Dark green and Light green stripes. Then you come to the cut watermelon. You paint the white and green part of the cut watermelon first, then you do the juicy part of the watermelon. Give the behind lighter shade and give the front cut watermelon a darker shade of red. Then you paint the seed of the watermelon in black. As the background is just plain paper. I used graded wash method. It is a method where the upper part is darker and slowly when you come down it becomes lighter. So I used graded wash method to make as if watermelon juice is coming out. The best part that I liked about this picture is the juice coming out of the watermelon. It gives a very nice final touch to the painting.

Forest Cottage

No Comments

This is a scenery of Lake side view cottage in the middle of a thick forest. I used water colors for this painting. First we have to finish the lighter trees which are in blue and are lighter than the nearer tree as the color of the trees fade away when we see it in a distance. Then we come to all the green parts. To separate different bushes and trees I used different shades of green. After finishing the green parts I came to the lake. I used blue water color for the lake. To make the lighter areas of the lake just add more water. But not too much as the paper will tear. Then you can do minute strokes with a thin, dry brush for grass. Then at the last you can do the little cottage with the color of your choice. But don’t make it too bright as it won’t make it look like an old cottage. I love this Painting because it has greenery and looks very beautiful.